Entering and Editing Worksheet
How to edit a worksheet in excel
After we’ve created a workbook, Now we may begin entering data into worksheets. Sometimes it needs to quickly modify the data to rectify mistakes, update information, or remove information if it changes. I.e we have to do operations like – Insert, Update and Delete on data.
1. Entering data in worksheet
We may put data straight into a cell or use the Formula bar to do so. A cell may carry up to 32,767 characters and any of three main categories of data: text, Numbers, or formula.
1.1 Entering text
Text can be entered into a worksheet to act as labels for data, column headings, or worksheet instructions.
Text is defined as any letter or number combination. In a cell, the text is automatically aligned to the left. If We input text that is longer than the current width of the column, the extra characters display in the cell to the right, as long as that cell is vacant (see Figure 1).
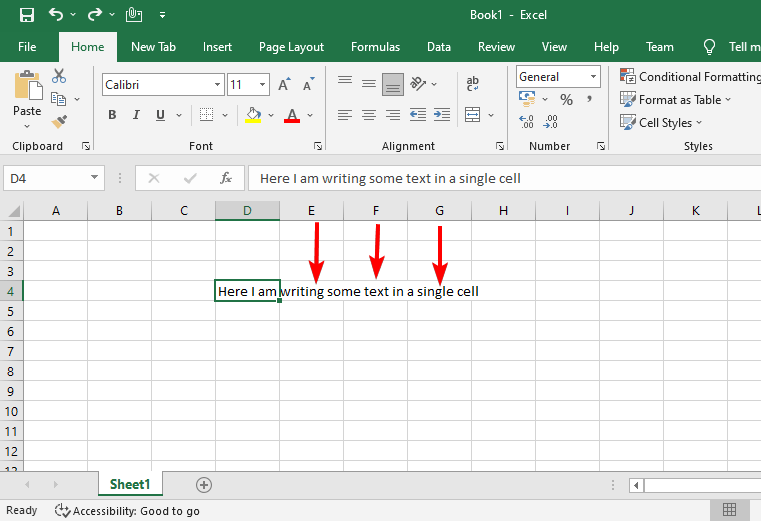
The lengthy text input is trimmed if the subsequent cell is not empty (see Figure 2).
The characters are not truly removed; instead, they will appear if the column width is altered to suit the long text input.
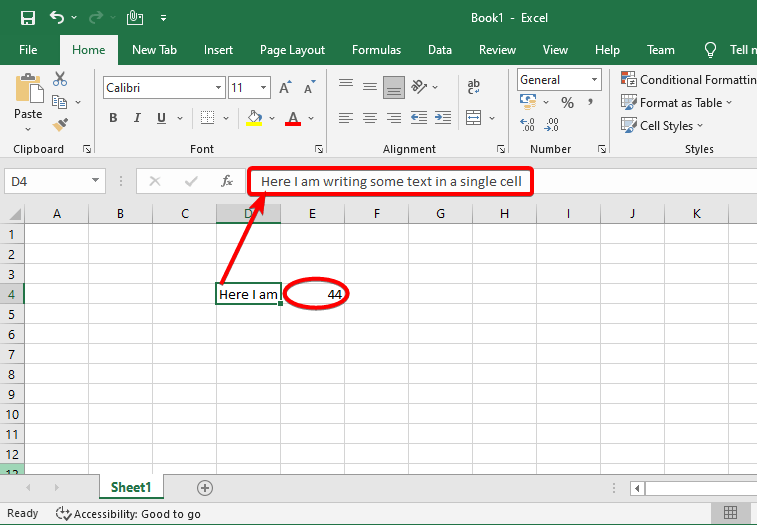
Steps to entering a text
- Choose the cell where We wish to add text.
- Enter the required text into the text box. We can add more words after comma, Semicolon, or space (not necessarily, we can add text data as we required)
- To exit from a cell after writing press Enter Key.
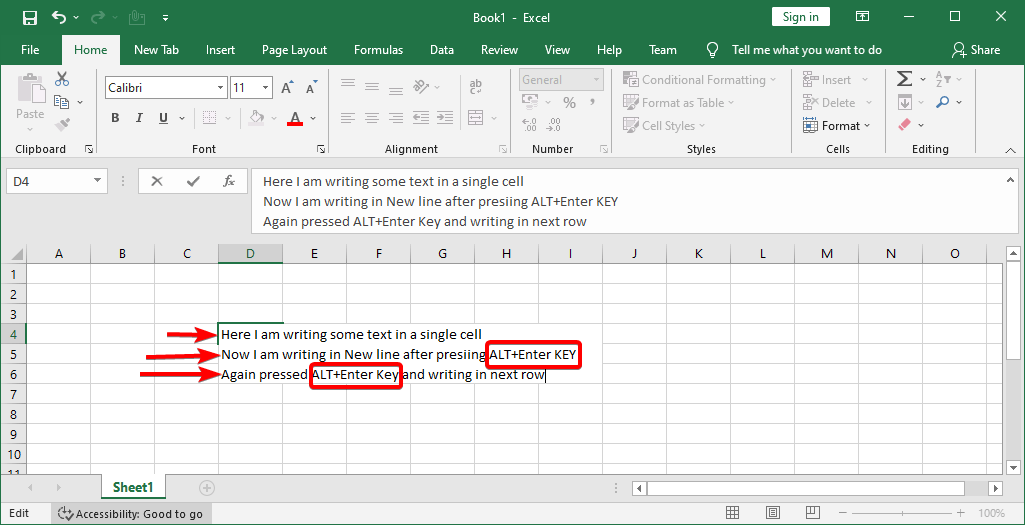
- But If there is a requirement of adding data in a new row or new line then we have to press the ALT+Enter key.
- After pressing Enter key to add new text and we can repeat it as we want.
1.2 Entering numbers
Numeric entries are made up entirely of numbers and are automatically aligned to the right in a cell.
Numbers can exist as stand-alone numbers or be utilised in formulae to compute other values.
We may input entire numbers (like 5 or 1,000), decimals (like 0.25 or 5.15), negative figures (like -10 or -5.5), percentages (like 20% or 1.5%), and currency values (like $0.25 or $20.99).
If a number does not fit within a column, it is represented by a sequence of pound signs (#####). Increase the column width to fit the number.
Steps to entering a number
- Choose the cell where We wish to input the number.
- Type the required number in it.
- Press the enter button to exist.
1.3 Entering dates and times
Dates and timings are treated as special sorts of numeric data in Excel.
To insert a date, do the following:
- Choose the cell where We wish to enter the date.
- Enter the month, day, and year, separated by a forward slash (/) or a hyphen (-).
- And then click Enter Key.
To insert a Time, do the following:
- Choose the cell where We wish to insert the time.
- Enter the hour, a colon (:), and the minutes, then hit the Spacebar, a for A.M. or p for P.M.
- And then click Enter key.
2. Editing data in worksheet
If a cell has a long entry and We just want to update a few characters, editing the data is faster than retyping the full entry.
We can modify the contents of a cell either directly in the cell or via the Formula bar.
Steps to editing data
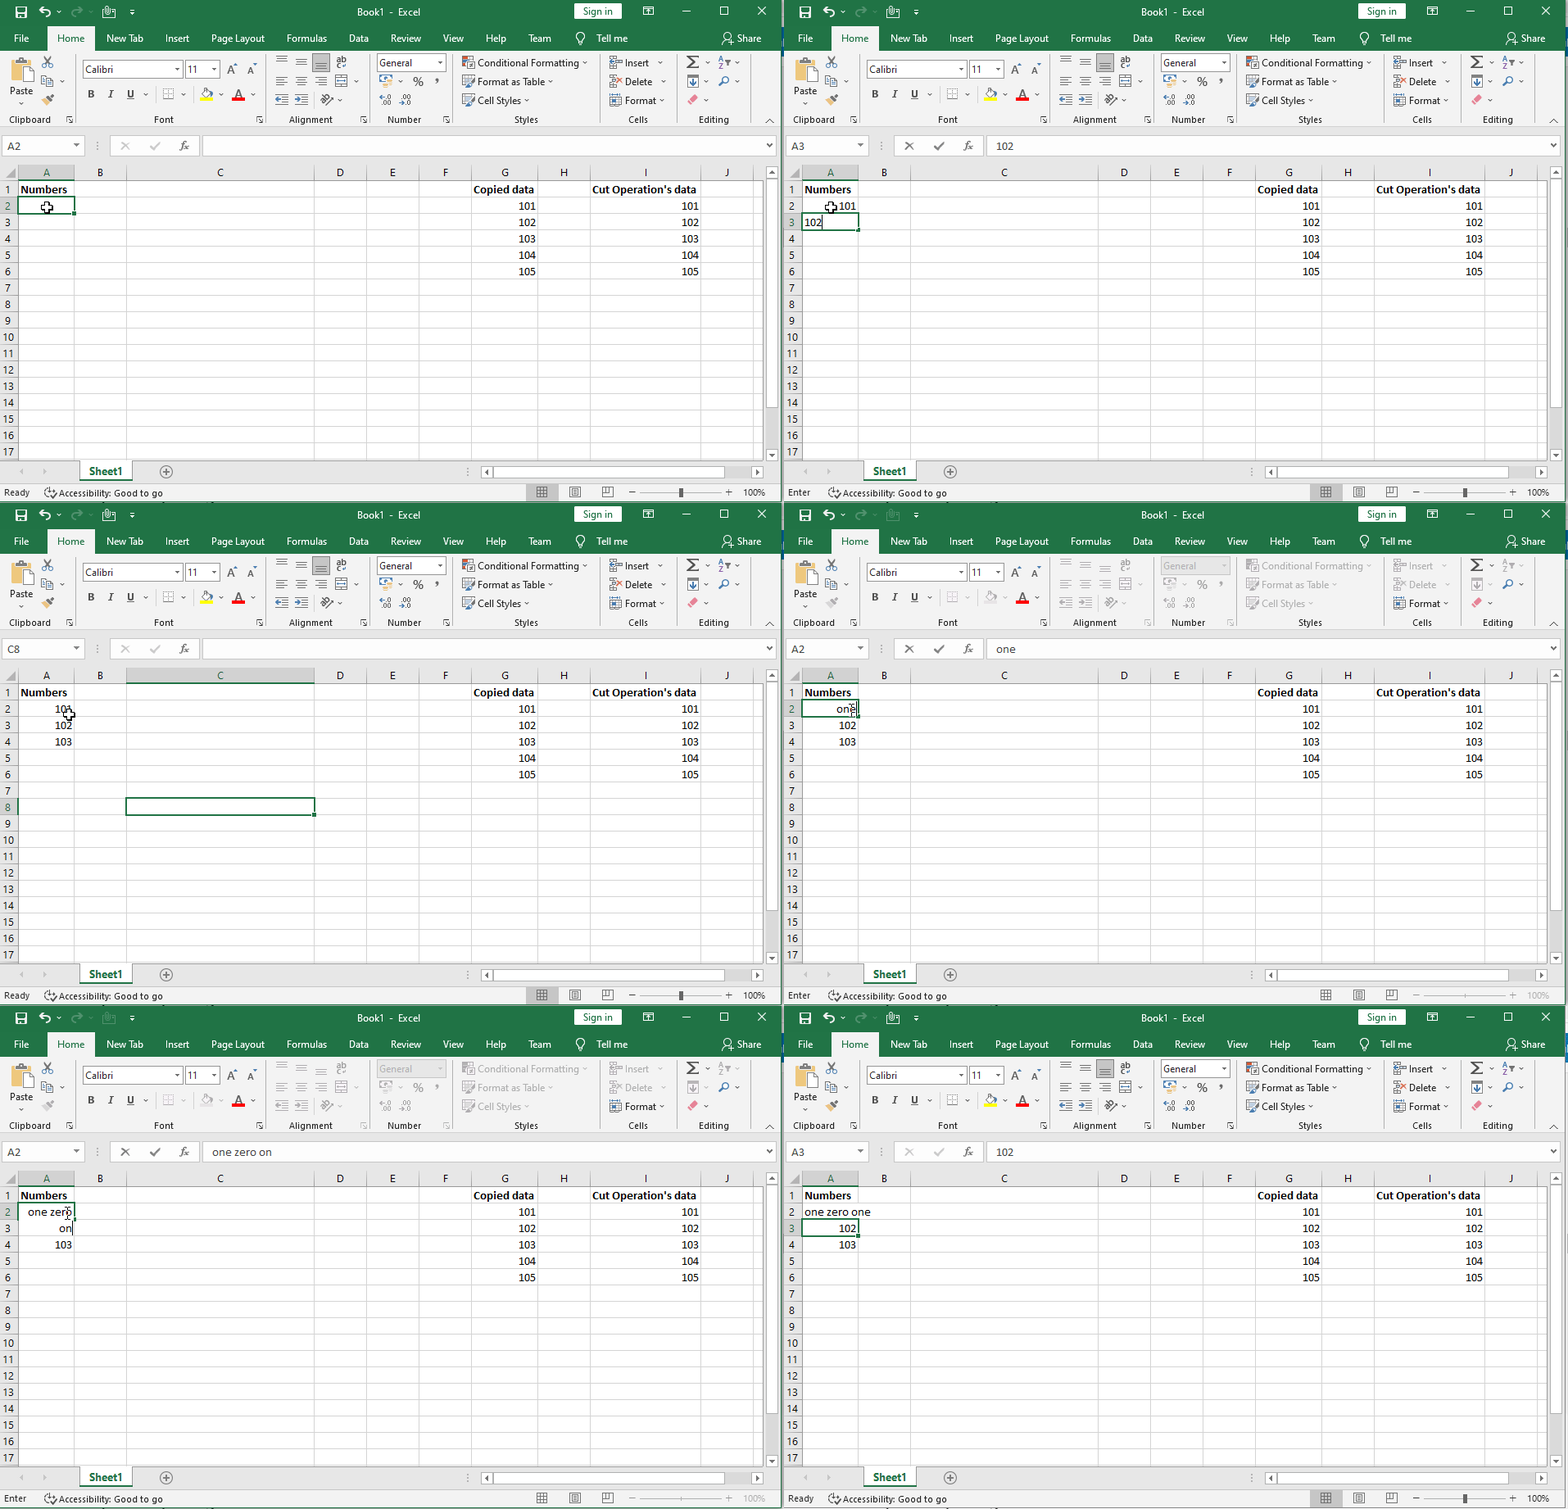
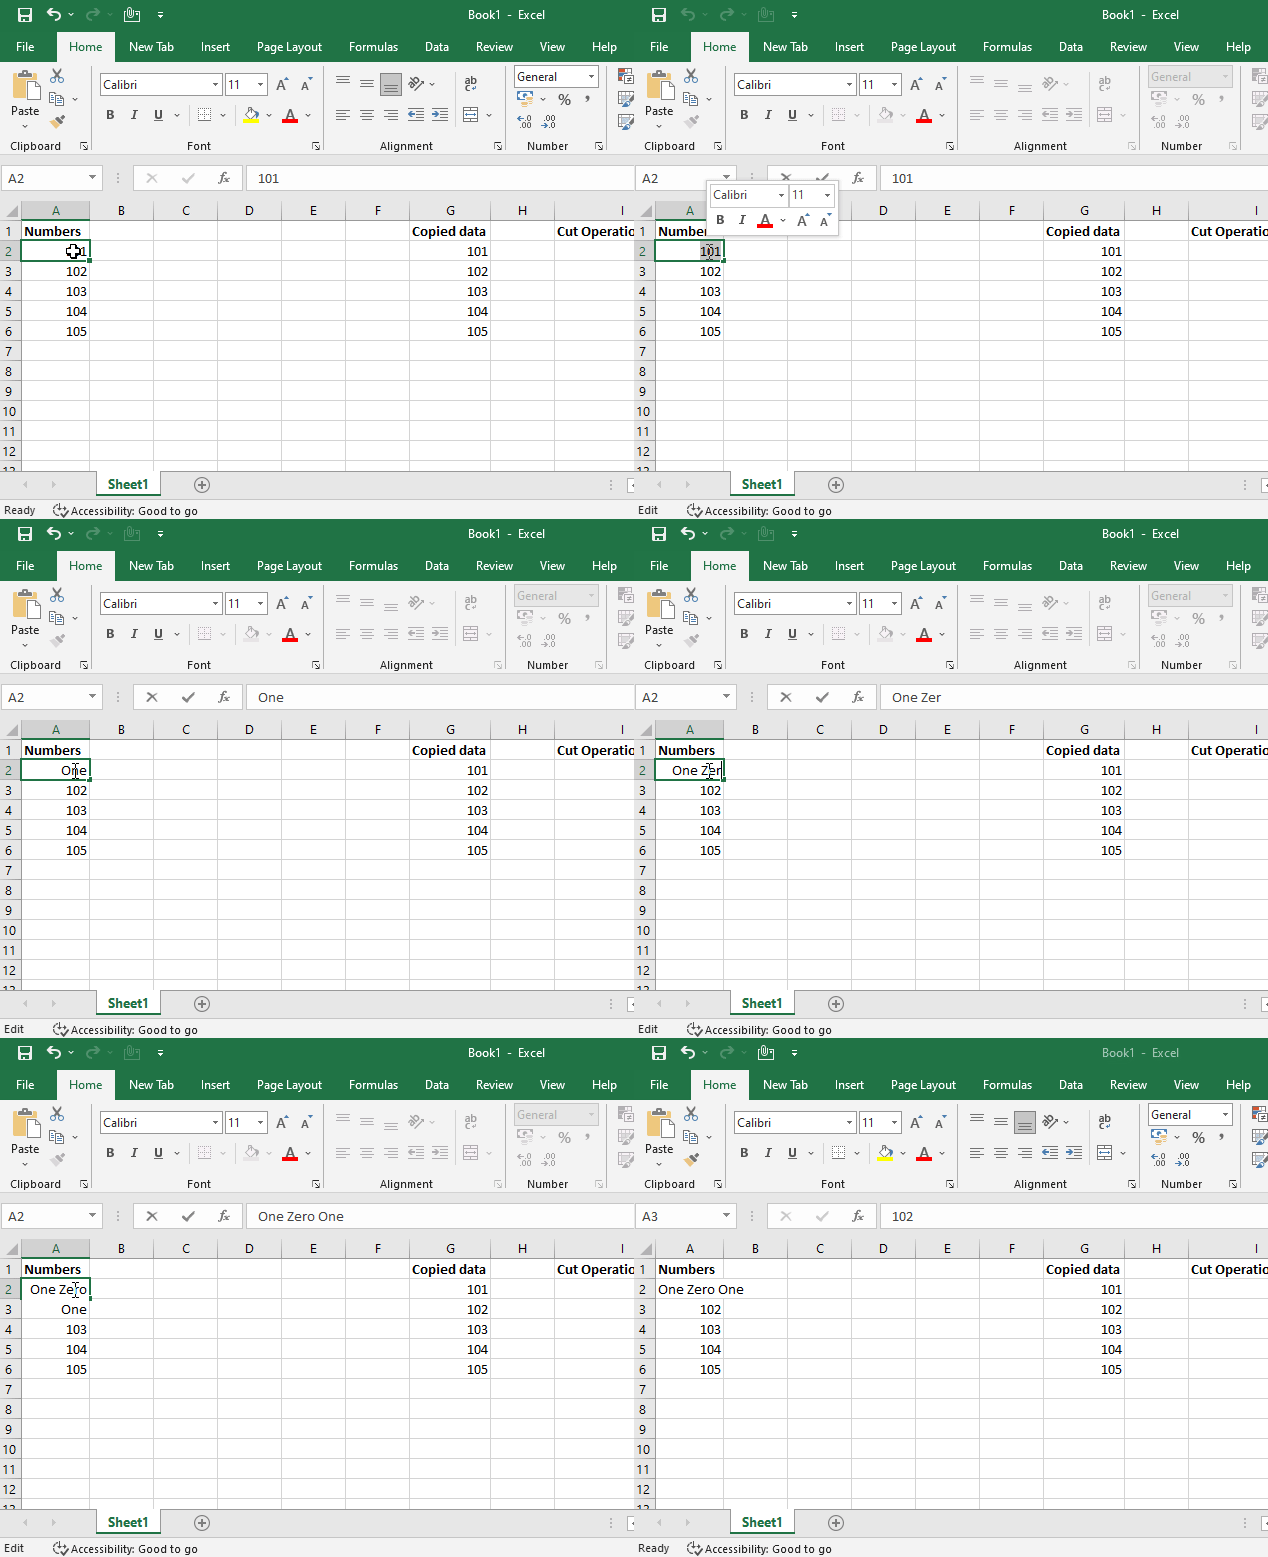
- double-click the cell containing the data we wish to change. In the cell where we double-clicked, the cursor (a flashing vertical line) appears.
- To insert characters, first, click where we wish to make changes, then input the new characters.
NOTE: The cursor can also be moved by hitting the Home, End, or arrow keys. - To erase characters, click where We wish to make changes, then hit Backspace or Delete.
- We can hit the Enter key when done or to exist.
- If We are altering data and decide not to save our changes, hit the Esc key to revert the cell to its original state.
- Using the Backspace or Delete keys deletes the character to the left of the cursor while using the Enter key deletes the character to the right of the cursor.
3. Replacing data in worksheet
We can replace a cell’s complete contents with fresh data. Any formatting that was applied to the cell remains the same and is applied to the new data.
Steps to replacing data
- Select the cell that contains the data and we want to replace.
- Type the new data, and then press the Enter key.
- Now we can see new data in place of the old ones.
4. Deleting data in worksheet
If the data in a cell is no longer required, we can erase the whole contents of the cell. Data deletion does not delete any formatting that has been applied to the cell.
Steps to deleting data
- Select the cell that contains the data and we want to delete.
- Then press the delete key. The data will remove now.
- Now we also use the BACKSPACE button of the keyboard to delete any selected data.
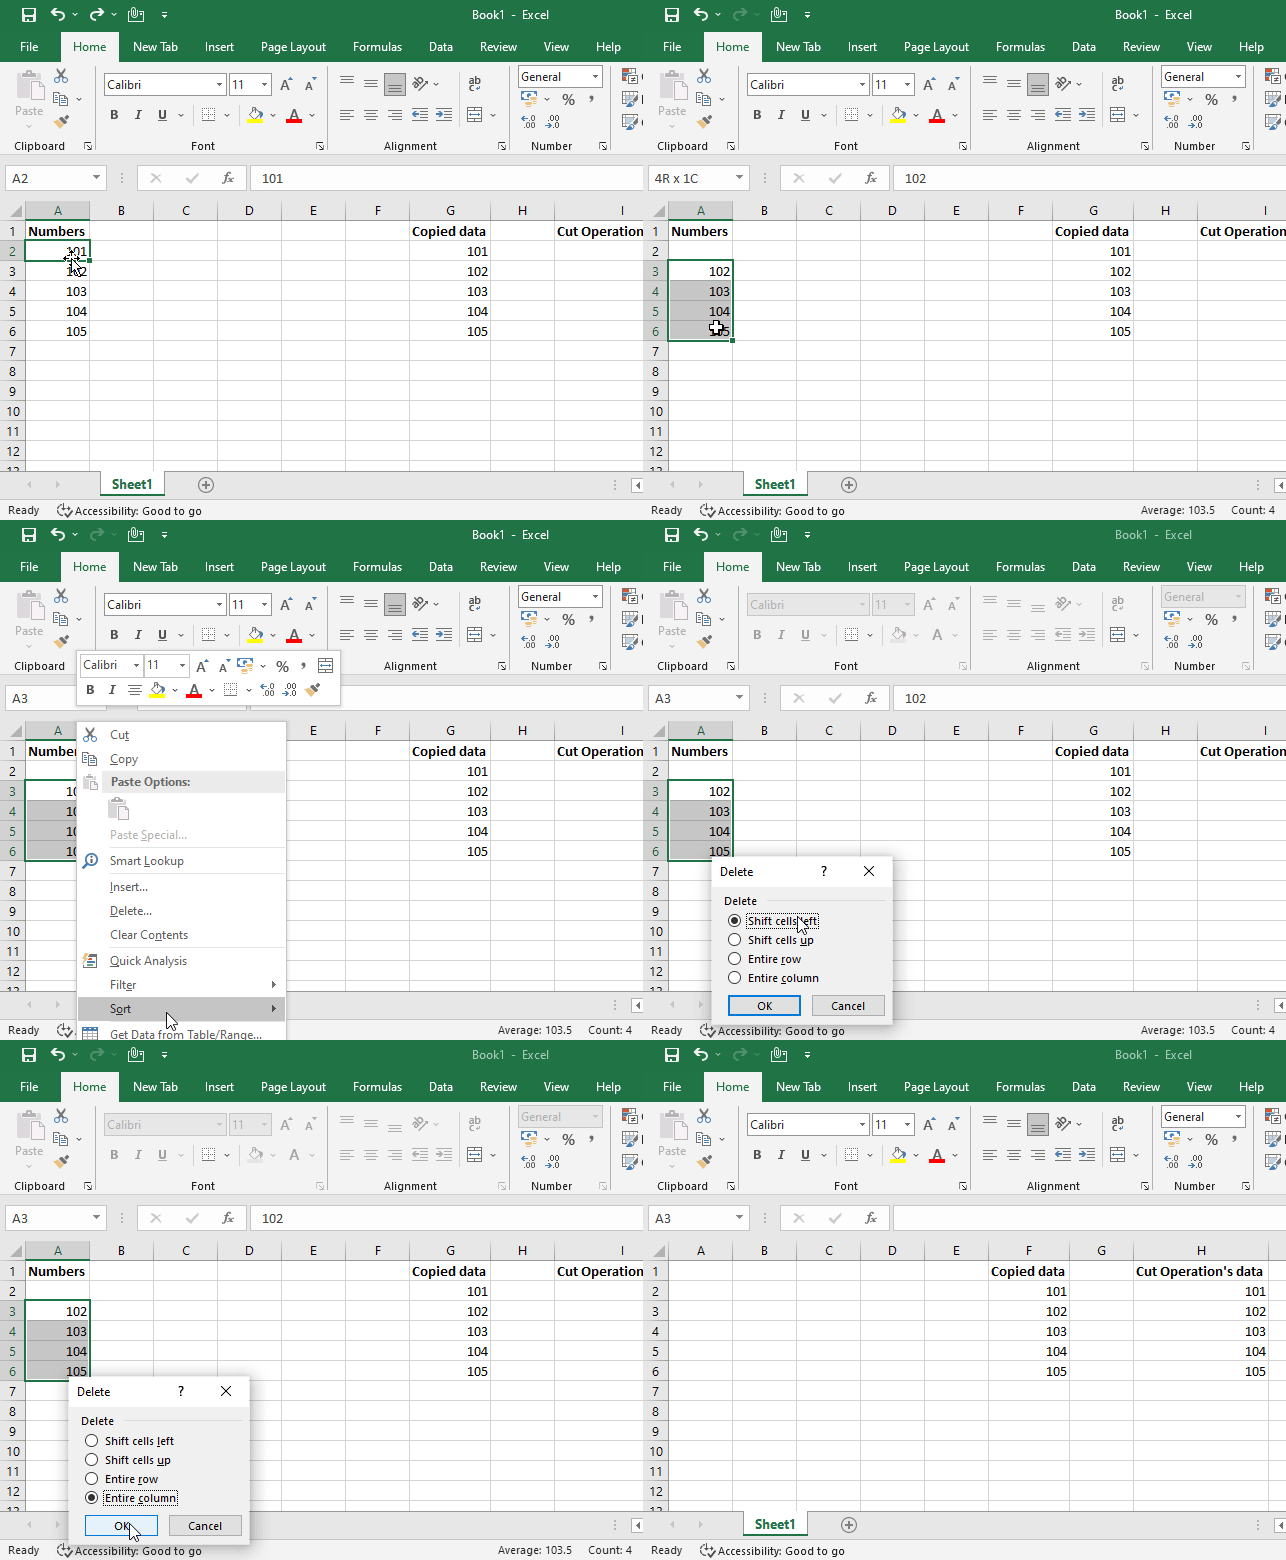
- If we select some data and right-click on that and then select the delete option. We will get a lot of options like- Entire Row, Entire column, or Shift Cell right or left (See below image).
5. Moving and copying cells
We may wish to replicate a cell in another area while changing a worksheet, or we may wish to remove (clip) a cell from its original location and set it in a new position. A copied cell may be pasted numerous times, but a cut cell may only be pasted once.
Data that is cut or copied is saved on the Clipboard, which is temporary storage space. We may get to it by clicking the dialogue box launcher in the Clipboard group on the Ribbon’s Home tab.

To move or copy a cell, do the following:
- Choose the cell that we wish to move or copy.
- In the Clipboard group on the Home tab, perform one of the following:
- Click the Cut button to move the cell. Alternatively, use Ctrl+X.
- Click the Copy button to copy the cell. Alternatively, hit Ctrl+C.
- Choose the cell where we wish to paste the copied or cut cell.
- In the Clipboard group on the Home tab, click the Paste button. Alternatively, hit Ctrl+V.
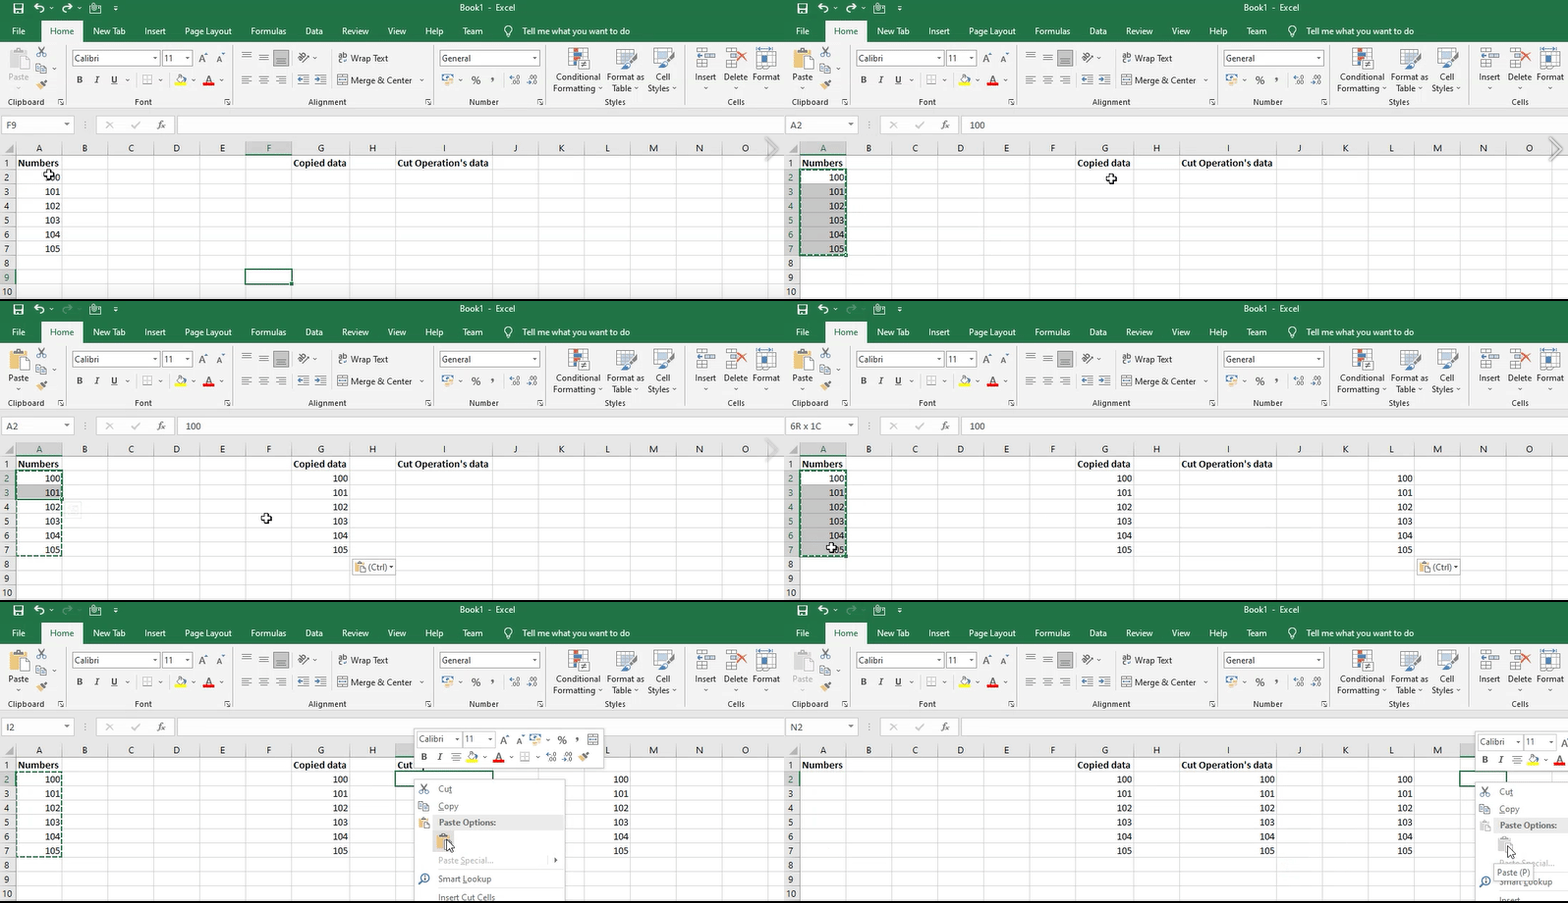
- A marquee (scrolling dotted line) displays around cells when we cut or copy them.
- By using the Esc key, we may erase the marquee (see Figure 8 ).
How to use paste special in excel sheet
The Paste Special command is a very handy editing tool. It gives us the ability to choose which feature of the copied cell to paste into the target cell.
We may select to paste only the copied cell’s formula, only the formula’s result, only the cell’s formatting, and so on.
To utilize the Paste Special command, we must first copy; when we cut, the Paste Special command is unavailable.
Steps to use paste special command:
- Choose the cell containing the value, formula, or formatting that we wish to replicate.
- In the Clipboard group on the Home tab, click the Copy button.
- Choose the cell into which we wish to paste the value, formula, or formatting.
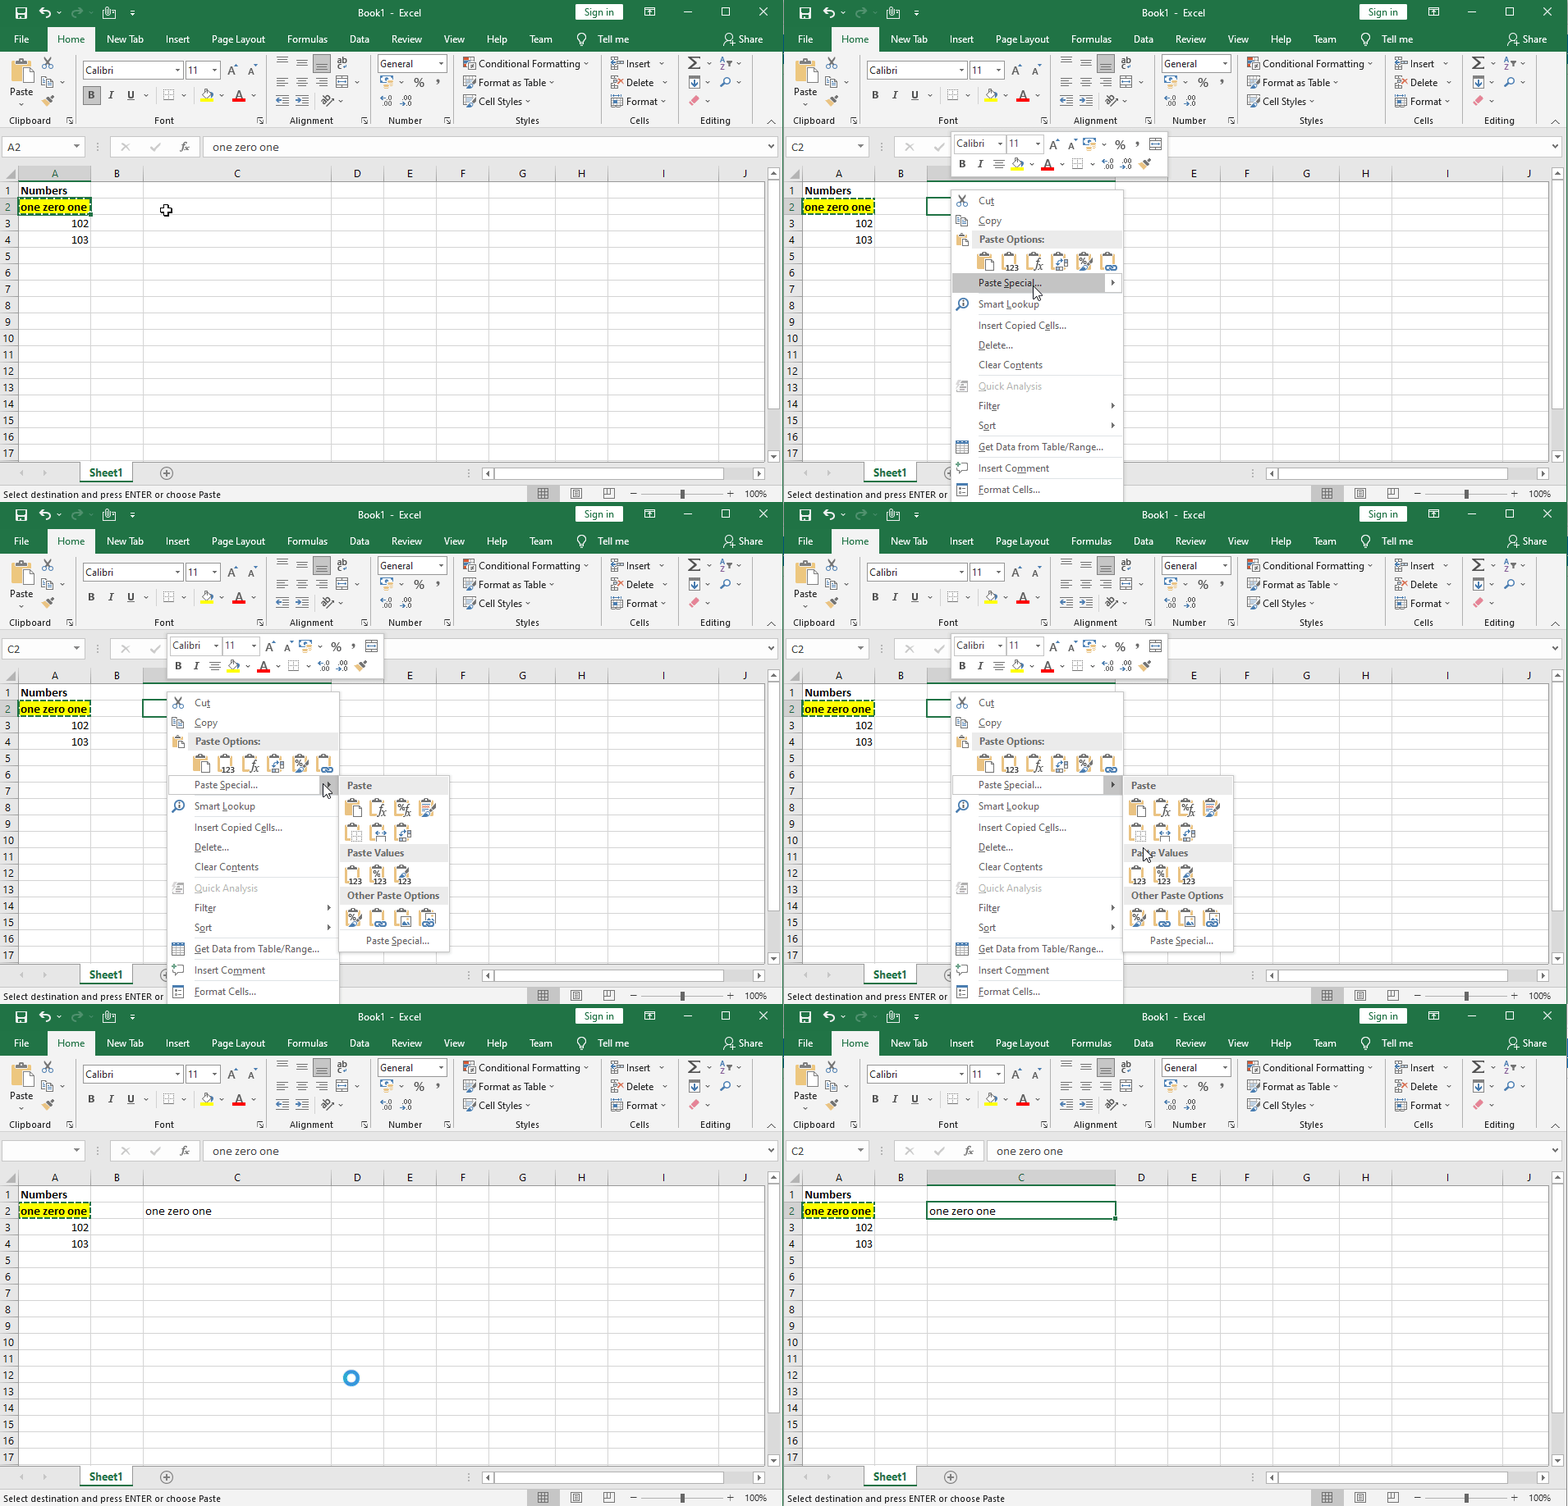
- In the Clipboard group on the Home tab, click the Paste arrow and choose the required choice from the menu (see Figure 9).
Hovering our cursor over a command in the Paste menu reveals its name in a ScreenTip. More choices are available by selecting Paste Special at the bottom of the menu.
6. How to clear a cell
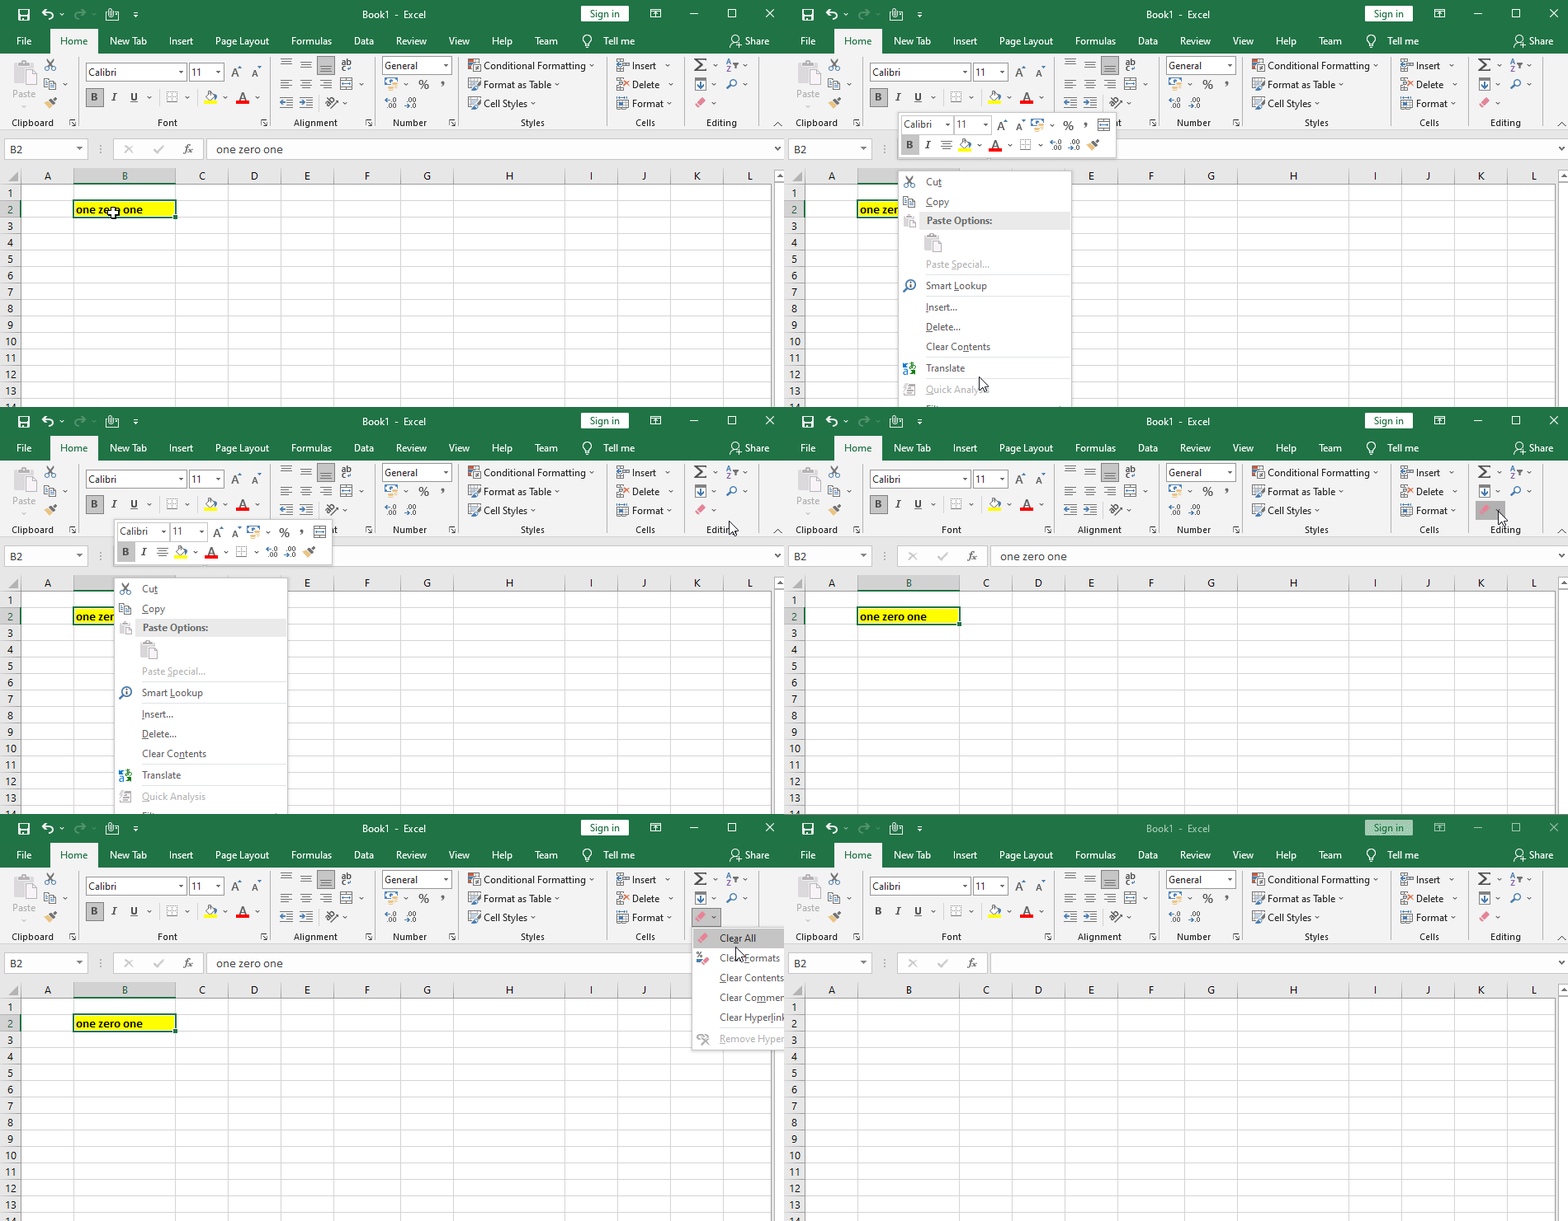
Clearing a cell removes its contents, formats, and comments. When clearing a cell, we must specify whether we want to remove one, two, or all three of these items.
Steps to clear a cell
- Select the cell we wish to delete.
- On the Home tab, under the Editing group, click the Clear button and choose the appropriate choice from the menu.
7. Undoing and redoing changes
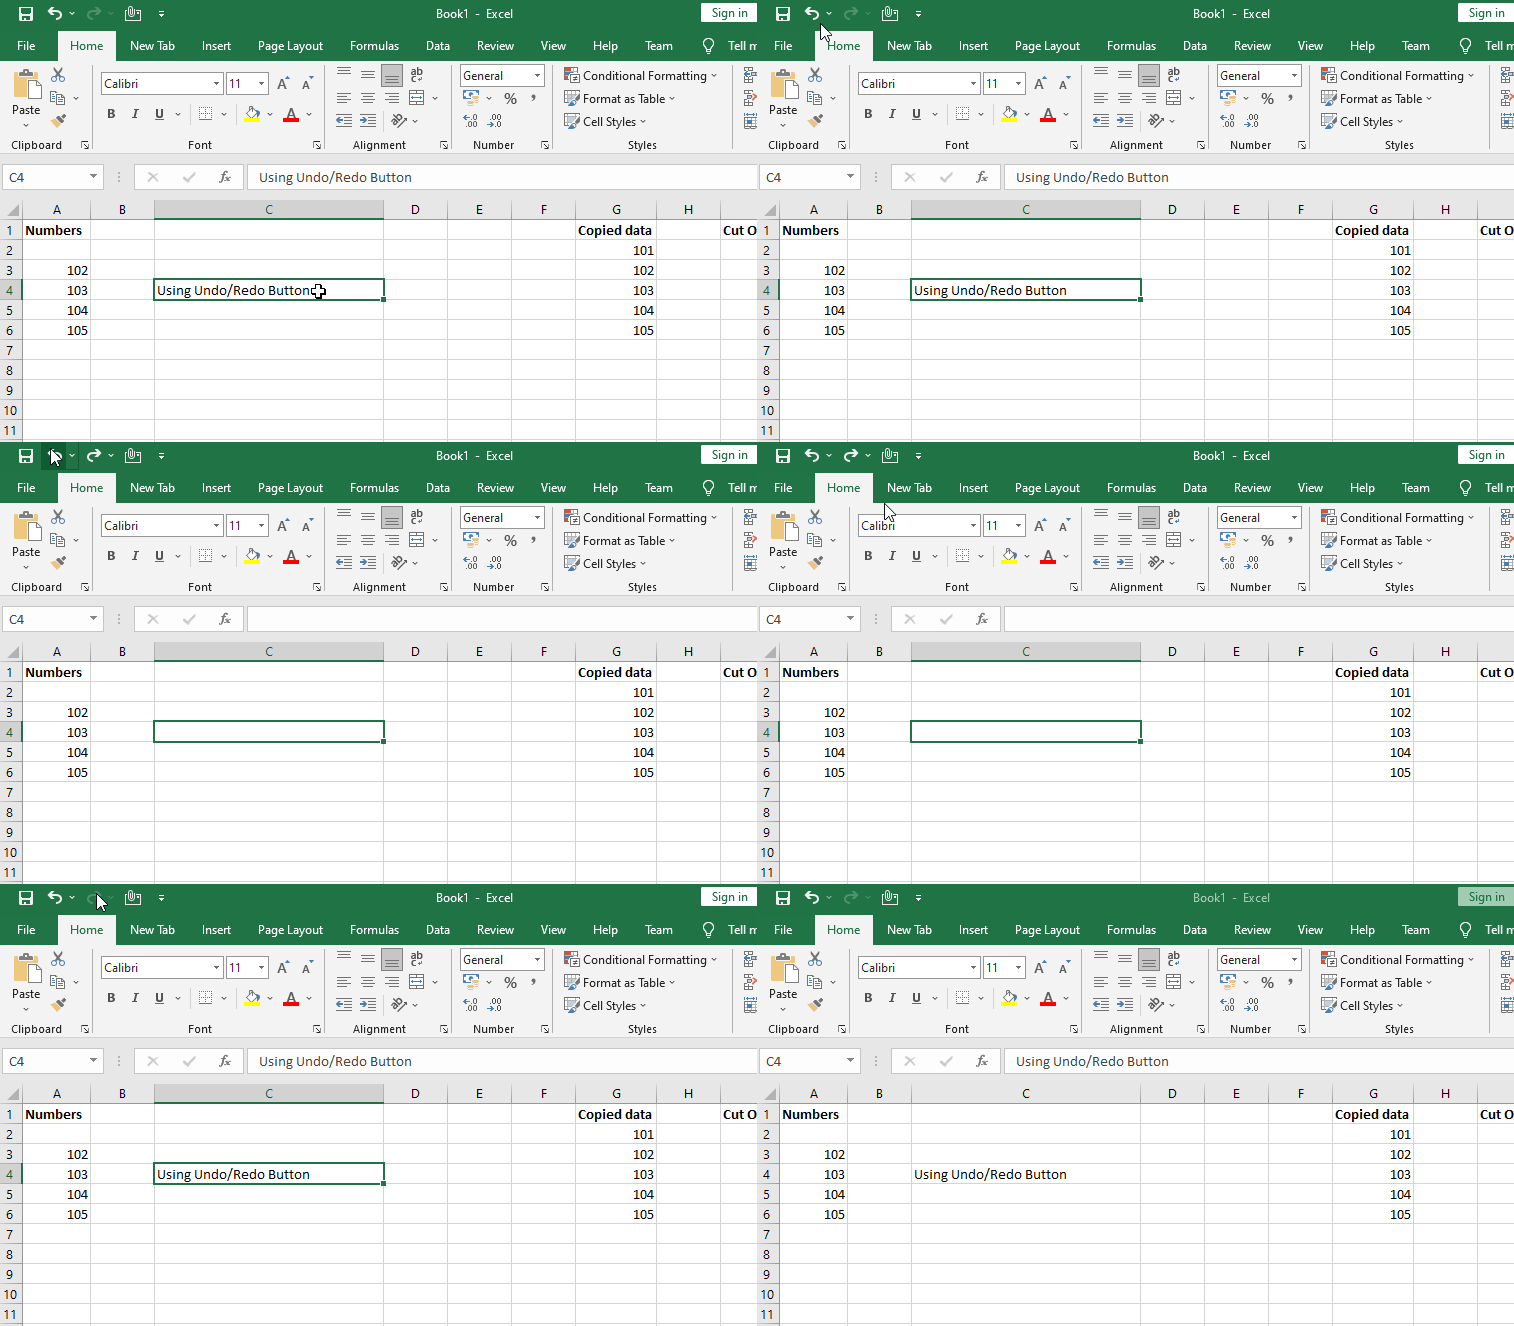
When we make a mistake, we may simply undo it by using the Undo command.
When we undo one or more activities, the Redo command appears, allowing us to recover the undone activities.
To undo an action:
Click the Undo button ↩ in the Quick Access toolbar. Alternatively, use Ctrl+Z.
To redo an action:
Click the Redo button ↪ on the Quick Access toolbar. Alternatively, hit Ctrl+Y.
THANK YOU FOR READING. PLEASE PROVIDE YOUR VALUABLE FEEDBACK.


hi!,I like your writing so much! share we communicate more about your article on AOL? I require an expert on this area to solve my problem. May be that’s you! Looking forward to see you.
Great post, you have pointed out some great points, I too conceive this s a very fantastic website.
I see something truly special in this web site.
But wanna say that this is very helpful, Thanks for taking your time to write this.
Awsome info and straight to the point. I am not sure if this is in fact the best place to ask but do you guys have any thoughts on where to get some professional writers? Thanks 🙂
This actually answered my drawback, thank you!
good post.Ne’er knew this, thankyou for letting me know.
If some one needs expert view on the topic of blogging
after that i advise him/her to visit this website, Keep up
the nice job.
What is Gluco6? Gluco6 is a revolutionary dietary supplement designed to help individuals manage their blood sugar levels naturally.
WONDERFUL Post.thanks for share..extra wait .. …