Understanding Excel Basics: Cells, Rows, Columns, and Worksheets
I. Introduction to Excel Basics
Excel is an incredibly powerful tool that can help you manage, analyze, and visualize data with ease. But, before you can start using it to its full potential, you need to understand the basics. In this comprehensive guide, we’ll take you on a journey to explore the fundamental building blocks of Excel: cells, rows, columns, and worksheets.

Excel BasicsWhat is Excel?
Excel is spreadsheet software developed by Microsoft that allows you to store, organize, and analyze data in a tabular format. It’s widely used in various industries, including business, finance, education, and more.
Why Use Excel?
Excel offers a range of benefits, including:
- Easy data management and analysis
- Visualization of data through charts and graphs
- Automation of repetitive tasks
- Collaboration and sharing of data with others
Getting Started with Excel
To get started with Excel, you’ll need to download and install the software on your computer. Once you’ve done that, you can launch Excel and start exploring its features.
II. Understanding Cells
In Excel, a cell is the smallest unit of data storage. It’s a rectangular box that can contain a value, formula, or function. Cells are the building blocks of an Excel worksheet, and understanding how they work is crucial to getting the most out of the software.
What is a Cell?
A cell is a single box in an Excel worksheet that can contain a value, formula, or function. Cells are identified by their column letter and row number, such as A1 or B2.
Types of Cell Content
Cells can contain different types of content, including:
- Numbers: numerical values, such as 1, 2, or 3.14
- Text: alphanumeric characters, such as names, addresses, or descriptions
- Formulas: mathematical expressions, such as =A1+B1
- Functions: predefined formulas, such as SUM or AVERAGE
- Dates: dates and times, such as 02/12/2023 or 14:30:00
Cell References
Cell references are used to identify cells in a formula or function. There are two types of cell references:
- Relative references: references that change when you copy a formula to another cell
- Absolute references: references that remain the same when you copy a formula to another cell
III. Working with Rows
Rows are horizontal ranges of cells in an Excel worksheet. They’re used to organize and structure data in a logical and meaningful way.
What is a Row?
A row is a horizontal range of cells in an Excel worksheet, identified by a row number, such as row 1 or row 2.
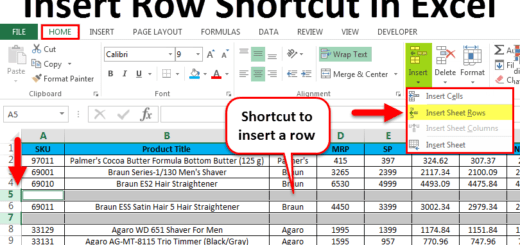
Inserting and Deleting Rows
You can insert and delete rows in an Excel worksheet using the following methods:
- Inserting rows: right-click on a row number and select “Insert” or use the keyboard shortcut Ctrl+Shift+=
- Deleting rows: right-click on a row number and select “Delete” or use the keyboard shortcut Ctrl+-)
Row Height and Width
You can adjust the height and width of rows to fit your data using the following methods:
- Row height: drag the row border up or down to adjust the height
- Row width: drag the column border left or right to adjust the width
IV. Managing Columns
Columns are vertical ranges of cells in an Excel worksheet. They’re used to organize and structure data in a logical and meaningful way.
What is a Column?
A column is a vertical range of cells in an Excel worksheet, identified by a column letter, such as column A or column B.
Inserting and Deleting Columns
You can insert and delete columns in an Excel worksheet using the following methods:
- Inserting columns: right-click on a column letter and select “Insert” or use the keyboard shortcut Ctrl+Shift+=
- Deleting columns: right-click on a column letter and select “Delete” or use the keyboard shortcut Ctrl+-)
Column Width
You can adjust the width of columns to fit your data using the following methods:
- Column width: drag the column border left or right to adjust the width
V. Organizing Data with Worksheets
Deleting worksheets: right-click on a worksheet tab and select “Delete” or use the keyboard shortcut Ctrl+-)
Worksheet Tabs
Worksheet tabs are used to navigate and organize multiple worksheets in an Excel workbook. You can:
- Rename worksheet tabs: right-click on a worksheet tab and select “Rename”
- Reorder worksheet tabs: drag and drop worksheet tabs to reorder them
- Color-code worksheet tabs: right-click on a worksheet tab and select “Tab Color” to assign a color
VI. Navigating and Selecting Cells, Rows, and Columns
Navigating and selecting cells, rows, and columns is an essential skill in Excel. Here are some tips to get you started:
Navigating Cells
- Moving to a specific cell: type the cell reference in the Name Box and press Enter
- Moving to the beginning or end of a row or column: press Ctrl+Home or Ctrl+End
- Moving to the next or previous cell: press Enter or Shift+Enter
Selecting Cells
- Selecting a single cell: click on the cell
- Selecting a range of cells: drag the mouse over the range of cells
- Selecting entire rows or columns: click on the row or column header
Selecting Multiple Non-Adjacent Cells
- Holding down the Ctrl key: select multiple non-adjacent cells by holding down the Ctrl key while clicking on each cell
- Holding down the Shift key: select a range of cells by holding down the Shift key while clicking on the first and last cell in the range
VII. Basic Data Entry and Editing Techniques
Now that you know how to navigate and select cells, rows, and columns, it’s time to learn some basic data entry and editing techniques.
Entering Data
- Typing data: simply type the data into a cell
- Copying and pasting data: use the Copy and Paste buttons or the keyboard shortcuts Ctrl+C and Ctrl+V
- Using AutoFill: use the AutoFill handle to fill a range of cells with a series of data
Editing Data
- Deleting data: use the Delete key or the Clear button
- Undoing and redoing changes: use the Undo and Redo buttons or the keyboard shortcuts Ctrl+Z and Ctrl+Y
- Formatting data: use the Number, Alignment, and Font groups on the Home tab to format data
VIII. Conclusion
Congratulations You’ve made it to the end of our comprehensive guide to understanding Excel basics: cells, rows, columns, and worksheets. By now, you should have a solid foundation in Excel and be ready to start exploring more advanced features and techniques.
Next Steps
- Practice, practice, practice: the best way to learn Excel is by doing. Practice what you’ve learned in this guide and experiment with different features and techniques.
- Explore advanced features: once you’re comfortable with the basics, start exploring more advanced features, such as formulas, functions, and charts.
- Join an Excel community: join online communities, such as the Excel subreddit or Excel forums, to connect with other Excel users and get help with any questions you may have.
Final Thoughts
Excel is an incredibly powerful tool that can help you manage, analyze, and visualize data with ease. By mastering the basics, you’ll be well on your way to becoming an Excel expert. Remember to practice regularly, explore advanced features, and join an Excel community to get the most out of this powerful software.